 Getting Started
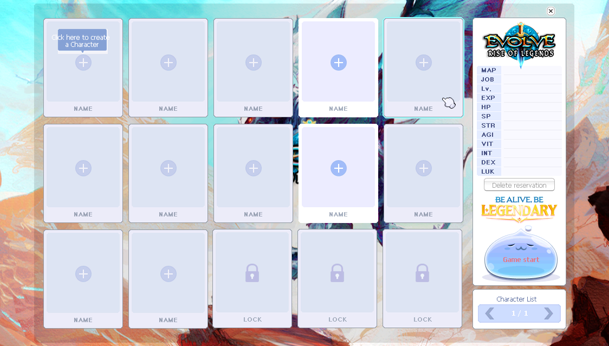
Before you can start playing, you need to set up a character (the person you will play as). Once you have logged in, you will be presented with a Server choice window. After this, you will see a number of empty boxes where you can create characters!
In-Game Character Window
Creating a Character
You will now need to choose your character's race, appearance, and name. Select a hairstyle and color
(the clothes you wear will be determined later by your class), and fill in a name.
Character Status Points
Once you enter eRO's world, you will be able to give your character his or her basic Status Points.
It is recommended that you look at the various
Job Classes and select the one you like.
You can play as any class you want, but first, select the first class or expanded class type.
As you progress, your level will rise and eventually you can advance into different classes!
About Status Points
There are 6 stats: STR, AGI, VIT, INT, DEX, and LUK.
You'll notice that you can only achieve a certain set of stats right now; you can raise them later in the game.
For example, if you would like to be a
Swordsman, it would be usually among STR, DEX, and VIT or AGI.
However, since you can't get all of them, just try getting a mix. Don't worry, it's normal to have a few messy stats.
Now create your character and follow the walkthrough provided in Izlude Town and the Eden Academy!
 Introduction to the World of Evolve
The world is divided up into a vast variety of regions. There are Towns where you are safe and can chat with other players;
there are Fields, the regions right out of towns where you can encounter wild monsters;
finally there are Dungeons, where more challenging travels await.
Finding Where You Are
Use the command /where in the chatbox to find out where you are. You will get a map name and coordinates.
Traveling: Getting from place to place is a common task you will need to do. There are many ways to get around.
Save Points: Each character has a save point. This is the place where you will return to if something goes wrong.
To set your save point, find a Kafra Employee in one of the cities (you can ask around if you don't know where).
Tip: Remember, you have a World Map to help you find your way if you get lost (click on the map below for a detailed view).
 The Eden Group
Instructor Ur | Instructor Boya | Secretary Lime Evenor | Gramps | Eden Teleport Officer
The Eden Group contains members that offer players a variety of useful services such as quests that give good
experience and equipment, teleporting services, kafra storage, VIP specific benefits, and many more.
To access the Eden Group Headquarters, simply speak to an Eden Teleport Officer
(they are white-haired Novice-esque females wearing green) pictured above.
They can be found near most Kafra and 1st class job change NPCs.
 Join the Group
1. Talk to Secretary Lime Evenor (moc_para01 27, 35) to register and select Join the Eden Group.
You can type anything as she will not actually check your spelling. She will give you the following items:
Note: It is suggested to register in the
Evolved Criatura Academy with the
Eden Academy Receptionist NPC first or else rewards above will not be received!
 Equipment Quests
These quests provide Base Level 12+ players free equipment sets that can last
up to level 99 transcendent jobs. These are highly suggested for new players.
At Base Level 60+, the quests give the final Eden equipment set. Base Level 99+ players are
suggested to do the Royal Banquet questline for the next free set, Noblesse Equipment.
Equipment Notes
It is advisable to keep old Eden equips until after passing the Base Level as a
Transcendent job, unless you are of a class which cannot transcend.
It is not possible to re-do those quests after Transcending.
The equipment can be sold to NPCs.
After completing any of the below equipment quests, the equipment is retrieved by
clicking the tiles at the foot of the blue double doors near (moc_para01 47, 39).
Once inside, go to the end of the hall and turn right into the room with Administrator Michael
(moc_para01 112, 95), to whom you must speak to retrieve your equipment rewards.
It is not necessary to be on the suggested map for any of the hunting quests.
For example, for the level 12-25 quest involving the Morocc Desert, players may find it simpler to
find a map with more scorpions; similarly, while hunting Orc Babies for the level 40 quest,
the East Orc Village may be preferable. However, as it is necessary to return to the NPC after each step, mileage will vary.
 How to Obtain Equipment
Instructor Boya | Administrator Michael
Talk to Instructor Boya behind the center of the counter
in the Eden Group Headquarters to start any of these training missions.
The quests from level 12 to 39 have two possibles mission set, while the quests from
level 40 to 69 have three possibles mission set (You get one of the available mission set, not all).
1. Report to Instructor Boya at the Eden Group Office.
2. Go to the back room, talk with Administrator Michael (moc_para01 112, 95) and get your rewards.
 Level 12 - 25
Note: The Standing Cat is located inside the Culvert. To access the Culvert:
1. Go to the Knight Guild in Prontera (prontera 45, 346).
2. Talk to the
Recruiter (prt_in 88, 105), choose "Volunteer.".
He'll warp you to outside the Culverts, and give you
3x  Red Potions,
1x
Red Potions,
1x  Milk,
1x
Milk,
1x  Orange Potion.
The Culvert Guardian in Prontera (prt_fild05 270, 212) will now let you enter the Prontera Culverts.
Orange Potion.
The Culvert Guardian in Prontera (prt_fild05 270, 212) will now let you enter the Prontera Culverts.
Level 26 - 39
Note: You can travel to both these dungeons using the Dungeon Teleporter.
Level 40 - 69
Note: Hooksha location is inside the hut in Orc Village that serve as a gateway between the
Orc Village and the Orc Dungeon. The hut's entrance is located at (gef_fild10 63, 337).
 Instructor Ur
Instructor Ur
(Eden Expansion Quests)
To begin the expansion quests, you must be base level 60+ and have changed to your second class or higher.
Just like Instructor Boya quests, they all have retroactive rewards
(i.e doing the level 100+ quests will grant you every item Instructor Ur gives in one go).
Talk to Instructor Ur behind the counter in the Eden Group Headquarters to start any of these training missions.
Level 60 - 69
Level 70 - 79
Level 80 - 89
Level 90 - 99
Level 99+
Note: At Level 100+, the next "free" equipment set is the
Noblesse Equipment, which starts with
The Royal Banquet.
 Ur's Items Rewards for Any Quest
After doing any training mission Ur has to offer, speak again with him, then go talk to
Blacksmith Thorn (moc_para01 111, 83) in the Equip Room to receive the following new equipment:
 Weapons Expert BK
Weapons Expert BK:
(moc_para01 112, 46) can enhance 3 times the
Eden Group's Weapon III with:
+3% ATK / +3% MATK (requires completion of level 70 or higher mission).
Heal (+3%)/20%, Physical Damage/10%, & Increased Magical Damage (requires completion of level 80+ mission).
For the damage option, the player can choose 1 race as the target: Brute, Plant, Fish, Insect or Dragon.
This process add cards to the weapon based on the type the player chooses to slot.
Doubling the previous enchant or card value (requires completion of level 90 or higher mission).
This whole process can only be done once on your selected Eden Group's Weapon III; result is permanent.
 Blacksmith Thorn Enchants
Blacksmith Thorn Enchants
Do a personal request for
Blacksmith Thorn Enchants:
(moc_para01 111, 83)
to unlock ability to enhance
Eden Group's Equipment with 2 randoms enchantments.
This can be repeated once per day with 0 chance of failure wherever already enchanted or not.
 Weapons by Classes
After completing certain Eden training quests level range (tier), you obtain a weapon based upon your class.
The more a weapon is advanced in tier, the stronger it gets compared to his previous counterpart.
The level requirement of the weapon also increase, but you keep all previous weapons as you progress.
Certain classes have a choice at each unlocking tier, independent of their previous selections.
i.e If you're a Swordsman-type class and choose the Eden Sabre
initially, you may still choose the Eden Slayer for the third tier.
All weapon characteristics are:
0 weight
0 slot
Cannot be traded, stored, or refined.
| Type | Equipment Name |
|
Type
|
Physical Defense:
|

Physical Defense:
|
| Type | Equipment Name |
|
Type
|
Physical Defense:
|
Physical Defense:
|
| Type | Equipment Name |
|
Type
|
Physical Defense:
|
|
Physical Defense:
|
| Type | Equipment Name |
|
Type
|
Physical Defense:
|
|
Physical Defense:
|
 Card System
Cards are items that are installed into equipment to provide beneficial effects to the player.
Equipments with slots can be installed with a card.
A maximum of 4 slots are available
on weapons, and 1 slot for footgears, garments, accessories, armors, shields and headgears.
 Acquiring Cards
You can acquire cards in different ways:
Most
monsters in-game have a 0.1% chance of dropping their own card.
Some usable items give cards such as:
Trade for or buy one from a vending shop.
Reward from Overlook Water Dungeon Quests.
 Installing Cards
By double-clicking the card, you can compound the card into a piece of equipment of your choice.
The card does not disappear from your inventory until you install the card in a piece of equipment.
To install, the equipment must have a slot available for a card to go in.
Cards only install into their own specific type of equipment category.
When double-clicked, you are shown list of equipment you currently have that the card can be put in to.
Right click the card to see what effect it gives, and where it can be installed.
To see if your equipment has a slot available for a card, simply mouse over the equipment in question.
If it does, it'll appear with suffix [1] to [4]. An example would be "Guard [1]", which means it has 1 slot for inserting a card.
Some equipment can have slots added to them via
 Socket Enchanting
.
Many weapons (mainly weapons that can also be bought from NPC shops) have multiple variants with different numbers of slots.
For example, "Blade [3]" is store-bought, and "Blade [4]" is dropped by monsters. If a piece of equipment is destroyed
because you failed when you tried to upgrade it, the equipment and all of the installed cards will be destroyed.
If a piece of equipment is damaged in battle, it will not harm the cards.
Certain bonuses are granted when using various combinations of cards at the same time. Most cards in sets are
inserted into different pieces of equipment. Set bonus, whether from equipment,
card or enchant are only applied once, even if the player have multiple instances of it.
| Type | Card Name |
|
|
Physical Defense:
|
|
Monster Name
|
| Type | Card Name |
|
|
Physical Defense:
|
|
Monster Name
|
| Type | Card Name |
|
|
Physical Defense:
|
|
Monster Name
|
| Type | Card Name |
|
|
Physical Defense:
|
|
Monster Name
|
| Type | Card Name |
|
|
Physical Defense:
|
|
Monster Name
|
| Type | Card Name |
|
|
Physical Defense:
|
|
Monster Name
|
 1. Potions
Using potions can restore the character's HP and SP. After turning on the automatic supply of potions, it can effectively improve the character's continuous combat effectiveness.
Potions can be obtained through daily rewards in the game, or purchased from NPCs via the Tool Dealer NPC in every major city.
2. Main Office
The Main Office, situated south-west from the popular tourist attraction, the Prontera fountain,
is a very impressive building in every regard.
Yet, as entering the warp portal quickly reveals, on the inside the office is something much more grand.
The Main Office houses a distinct floor, each full of hustle and bustle. The diligent NPCs have made sure the selection offers something for every kind of visitor.
First Floor (Entrance)
Second Floor (Treasury)
Third Floor (Style Boutique)
Fourth Floor (The Crow's Nest)
Basement Floor (Gymnasium)
 3. Evolve Coin
By completing quests and monster hunting in Midagrd every day, you can obtain Evolve Coins and exchange them for useful reward incentives in the Main Office!
Each monster in the game drops Evolve Coin with a 2% chance.
 4. Butterfly Wings
You can use Butterfly Wings to teleport back to your current bound main city. Saving to the main city can be done via the Kafra Corp. NPC in every city and town.
Butterfly Wings can be obtained through daily rewards in the game, or purchased from NPCs via the Tool Dealer NPC in every major city.